Robot Class is a separate class which is part of Java not a part of Selenium, Robot class is mainly created for automating Java Platform implementation.

As per the class description, this class is used to generate native system input events like to control the mouse and keyboard. it is part of the Java API awt pack.
What is need of Robot Class ?
As we know we need a locator for the element to perform any action on a web element. But Windows pop-ups don’t have any locators, as they are not part of the webpage, they are native OS pop-ups. To handle such kind of pop-ups we need the Robot class. For example: Download Email Attachment, Windows pop-up, Save Attachment prompts to specify Download Location, appears in any webpage then it is nothing but a native OS pop-up.
We can’t use Action class methods to handle keyboard/mouse events on Desktop windows pop-up. Because Actions class methods need WebElement objects to perform actions. Whereas no locator exists for Desktop windows pop-up. We can verified it by using browser developer tools. Therefore, to handle such scenarios we used the Robot class.
Methods in Robot Class
java.awt.Robot class provides various methods needed for controlling mouse and keyboard as shown as below.
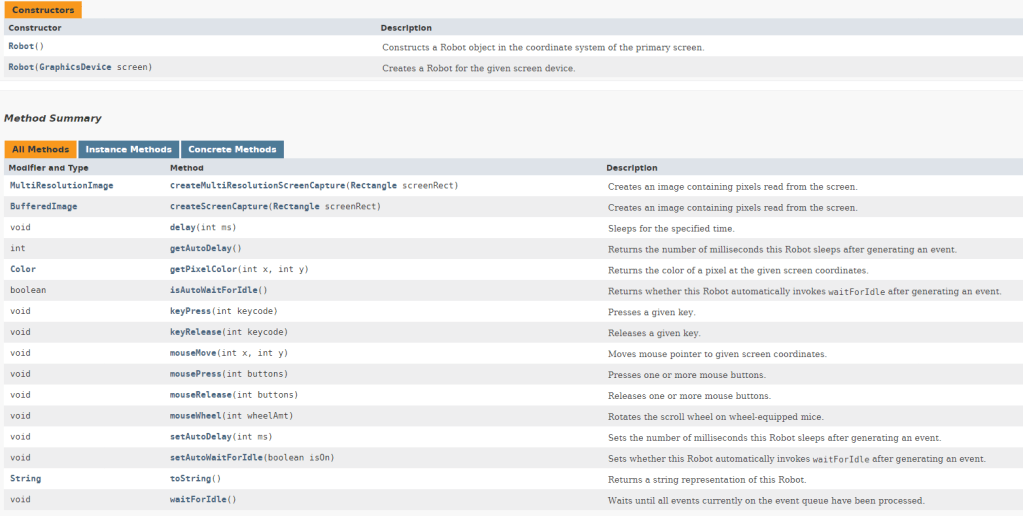
Following are some commonly used Robot class methods which we used in browser test automation:
Keyboard Methods:
keyPress():This method presses a given key. For example:keyPress(KeyEvent.VK_SHIFT)method presses ”SHIFT’ keykeyRelease(): This method releases a given key. For example:keyRelease(KeyEvent.VK_SHIFT)method releases ”SHIFT” key
Mouse Methods:
mousePress(): This method presses one or more mouse buttons.For example:mousePress(InputEvent.BUTTON1_DOWN_MASK)method is used left click mouse buttonmouseRelease(): This method releases one or more mouse buttons. For example:mouseRelease(InputEvent.BUTTON1_DOWN_MASK)method is used to release the left mouse button clickmouseMove(int x, int y): This method moves the mouse pointer to given screen coordinates specified by x and y values. For example:mouseMove(100, 50)will move the mouse pointer to the x coordinate 100 and y coordinate 50 on the screen.
Advantages:
- It provides control over the Keyboard and Mouse events.
- With the help of Robot Class we can handle interactions with Operating System pop-ups support which is not possible with Selenium Web Driver API.
- Robot class is especially useful in managing file upload/download actions by interacting with OS pop-ups.
- Robot Class can easily integrated with current automation framework (keyword, data-driven or hybrid) as this class is part of Java package.
Limitation of Robot class
- Most of the methods like
mouseMove()are dependent on screen resolution so the method may perform differently on different screens. - This class acts only on the window in focus so the behavior may differ when multiple windows open. For example if you are write code for robot class event and during execution if user moves in other window then it will not work.
- Switching between different frames or windows is difficult with Robot methods.
Some Example Code
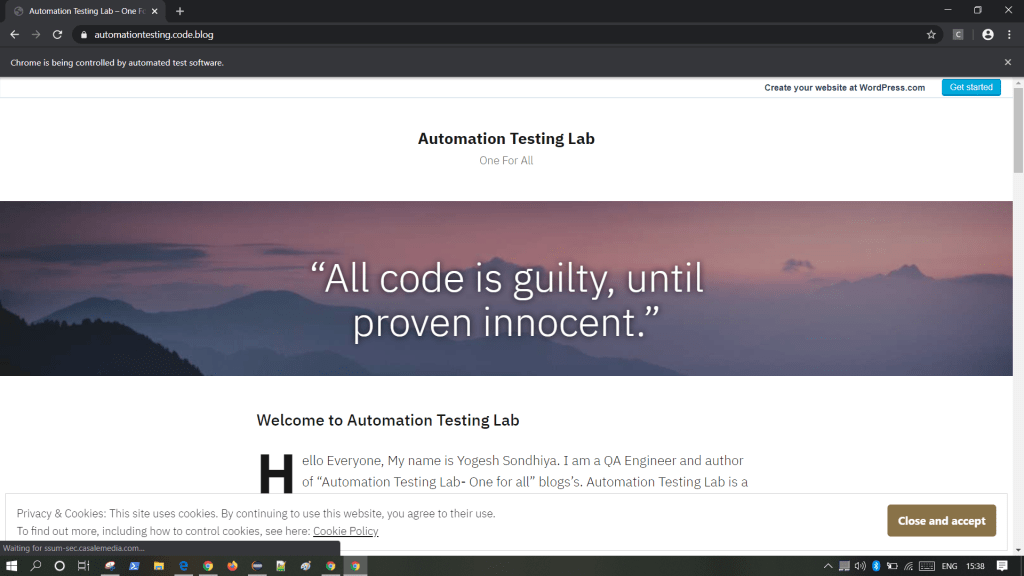
Scroll Mouse Using Robot class:
package automationTestingLab;

import java.awt.AWTException;
import java.awt.Robot;

import org.openqa.selenium.WebDriver;
import org.openqa.selenium.chrome.ChromeDriver;

public class ScrollPageByMouse {

	public static void main(String[] args) throws AWTException {
		System.setProperty("webdriver.chrome.driver","F:\\chromedriver.exe");
		WebDriver driver = new ChromeDriver();
		driver.manage().window().maximize();

		// Open the required URL
		driver.get("https://automationtesting.code.blog/");

		// Create object of Robot class
		Robot robot = new Robot();

		// Scroll MouseWheel
		robot.mouseWheel(10);
	}
}
Upload a File Using Robot Class
There are multiple ways to upload files in Selenium Webdriver. We can directly use sendKeys(“File path”) method but sometime this methods does not work. Then We can use Robot class to upload files in Selenium.
Steps to upload file using Robot class
Step 1- We have to copy the file location in system clipboard.
Step 2- We have to click on upload button
Step 3- Use CTR+V and ENTER.
Note- Robot class each key has to press and release respectively
package automationTestingLab;

import java.awt.AWTException;
import java.awt.Robot;
import java.awt.Toolkit;
import java.awt.datatransfer.StringSelection;
import java.awt.event.KeyEvent;

import org.openqa.selenium.By;
import org.openqa.selenium.WebDriver;
import org.openqa.selenium.chrome.ChromeDriver;

public class FileUploadUsingRobotClass {

	public static void main(String[] args) throws AWTException, InterruptedException {
		System.setProperty("webdriver.chrome.driver","F:\\chromedriver.exe");
		WebDriver driver = new ChromeDriver();
		driver.manage().window().maximize();

		// Open the required URL
		driver.get("https://www.indeed.co.in/");

		// Click on post your resume link
		driver.findElement(By.xpath("//div[1]/div[1]/div[1]/div[3]/div[2]/a[1]/span[1]")).click();

		// Click on upload resume button
		driver.findElement(By.xpath("//div[1]/div[2]/div[1]/div[1]/div[1]/div[1]/button[1]")).click();

		// Specify the file location with extension
		StringSelection file = new StringSelection("F:\\SoftwareTesterResume.docx");

		// Store the location of the file in clipboard
		Toolkit.getDefaultToolkit().getSystemClipboard().setContents(file, null);
		System.out.println("selection" + file);

		// Create an object for robot class
		Robot robot = new Robot();

		// To paste the value press ctrl+v
		robot.keyPress(KeyEvent.VK_CONTROL);
		robot.keyPress(KeyEvent.VK_V);

		// Release ctrl+v
		robot.keyRelease(KeyEvent.VK_CONTROL);
		robot.keyRelease(KeyEvent.VK_V);
		Thread.sleep(2000);

		// Press Enter
		robot.keyPress(KeyEvent.VK_ENTER);

		// Release Enter
		robot.keyRelease(KeyEvent.VK_ENTER);
	}
}
We can also use AutoIT for file uploading.
Get whole screen Screenshot using Robot class
As everyone knows we can take screenshot with the help of Selenium API so the question is why we need Robot class for it. Because there is some limitations when we use Selenium API for taking screenshots.
1. When you call screenshot method and if any windows alert occur on screen then it will fail and It will give you an exception org.openqa.selenium.UnhandledAlertException.
2. It takes screenshot of visible area of browser. It will not capture address bar and tab opened. Due to this while running cross-browser testing if you need to verify that test is running on which browser then you won’t be able to verify.
package automationTestingLab;

import java.awt.AWTException;
import java.awt.Rectangle;
import java.awt.Robot;
import java.awt.Toolkit;
import java.awt.image.BufferedImage;
import java.io.File;
import java.io.IOException;

import javax.imageio.ImageIO;

import org.openqa.selenium.WebDriver;
import org.openqa.selenium.chrome.ChromeDriver;

public class CaptureScreenShotUsingRobotClass {

	public static void main(String[] args) throws AWTException, IOException {
		System.setProperty("webdriver.chrome.driver","F:\\chromedriver.exe");
		WebDriver driver = new ChromeDriver();
		driver.manage().window().maximize();

		// Open the required URL
		driver.get("https://automationtesting.code.blog/");

		// Create object of Robot class
		Robot robot = new Robot();

		// Get the screen size as a Rectangle
		Rectangle screenSize = new Rectangle(Toolkit.getDefaultToolkit().getScreenSize());

		// Use createScreenCapture of Robot class and capture screenshot by providing size
		BufferedImage img = robot.createScreenCapture(screenSize);

		// Define destination path for screenshot
		String path = System.getProperty("user.dir") +"\\ScreenShot" +System.currentTimeMillis() + ".png";
		// copy temp file in to permanent file
		ImageIO.write(img, "png", new File(path));

	}
}
Output
As you see with the help of Robot class we can takes screenshot of whole desktop. Also It gives extra information about screenshot such as URL, Time and date.
Next
